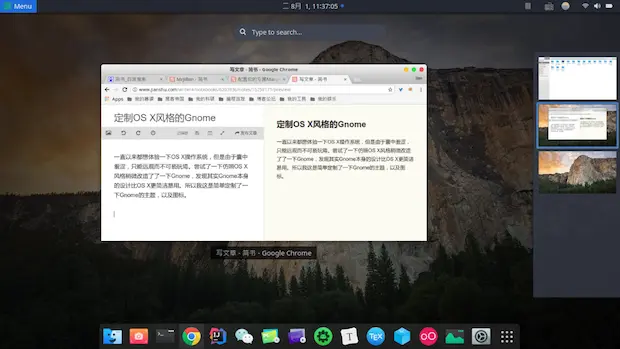
定制 OS-X 风格的 Gnome
没有 Mac 也能体验 macOS 风格——Gnome 桌面定制全记录。
一直以来都想体验一下 OS X 操作系统,但是由于囊中羞涩,只能远观而不可亵玩焉。尝试了一下仿照 OS X 风格稍微定制了一下 Gnome,发现其实 Gnome 本身的设计比 OS X 更简洁易用。我只是简单定制一下,让系统看起来像 MacOS,但是并没有改变 Gnome 的操作方式。
发行版:首先我选择了 Manjaro 的 Gnome 发行版,选择这个发行版的原因是它基于 Arch,软件源丰富,安装软件十分方便。
一、安装 Mac Gtk 主题
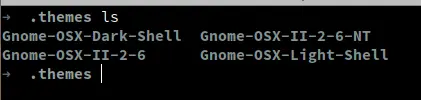
下载 GNOME OS X II GTK theme 后解压到 ~/.themes 目录
二、安装 Mac 图标集
下载 La Capitaine 图标集,然后解压到 ~/.icons 目录。

三、添加桌面 Dock
打开 Tweak Tool 之后,先将刚刚安装的主题和图标设置好
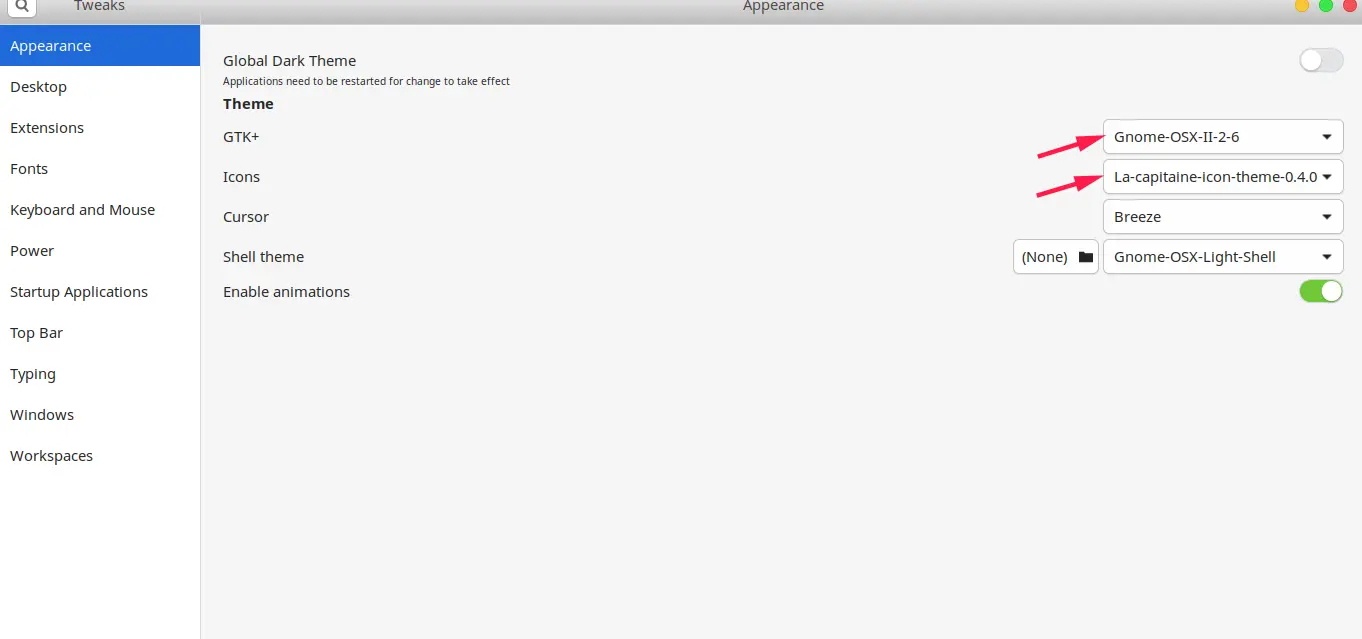
设置好之后你就会发现整个系统的主题和图标已经和 Mac 没什么两样了。那么 Dock 栏如何设置呢?
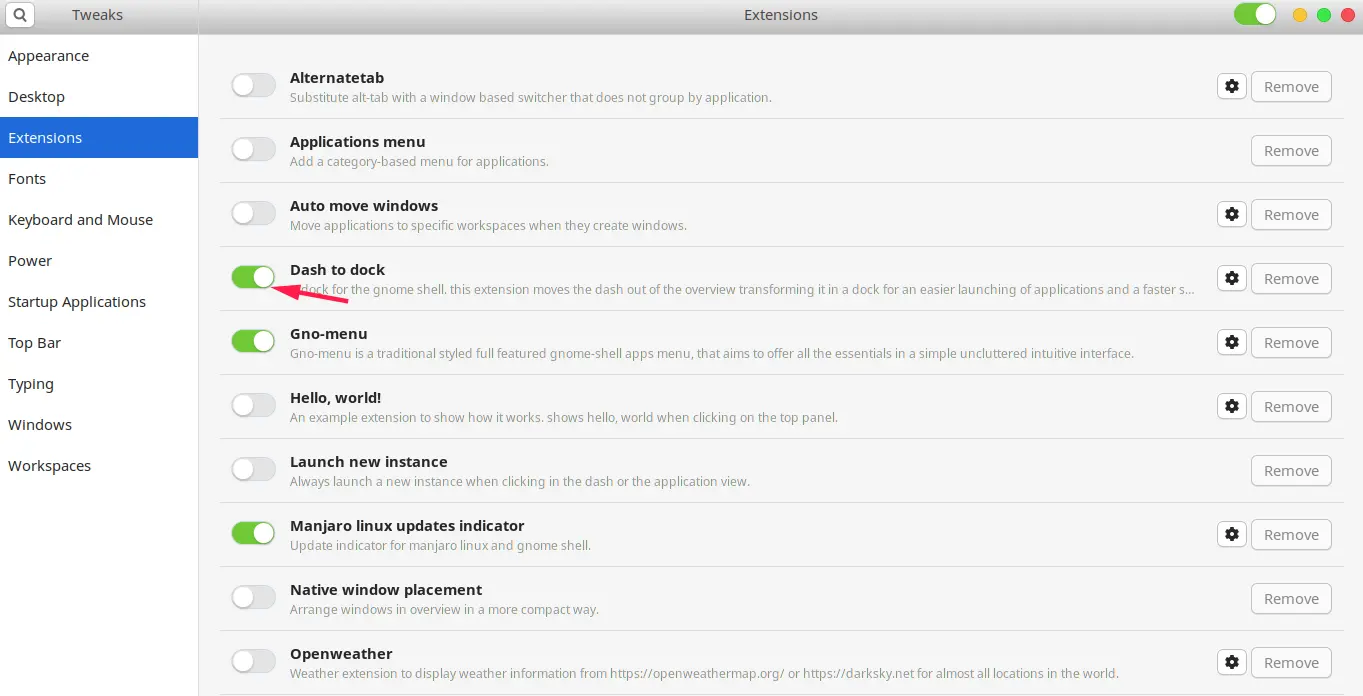
在 Tweak Tool 里面打开 Dash to dock 插件就可以了
这样设置完之后你就会发现你的 Dash 变成了这样
四、MacOS 壁纸
关于 Mac OS X 的壁纸已经全部分享百度云盘里面了。
至此,外观上的设置已经差不多了,下面进入定制的核心部分。
首先是软件的安装
必备软件有:
搜狗输入法、Deepin Screenshot、Google Chrome、Electronic weChat、musicbox、xflux-gui、Eclipse。
Manjaro 由于墙的原因,在国内安装一些软件会特别慢,所以你只需要添加个 Arch 的源就可以了。
在终端输入以下命令:
sudo nano /etc/pacman.conf
在文件底部加入如下几行,保存退出。
[archlinuxcn]
SigLevel = Optional TrustedOnly
Server = https://mirrors.ustc.edu.cn/archlinuxcn/$arch
然后执行
sudo pacman -Syyu
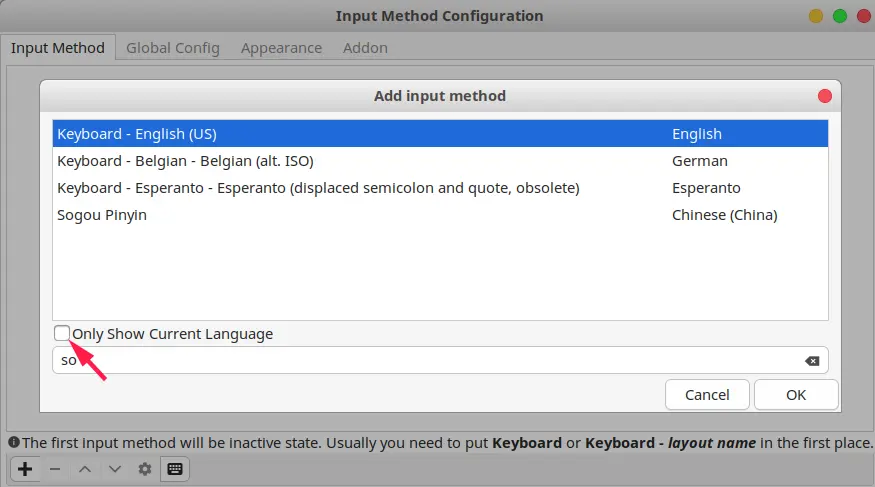
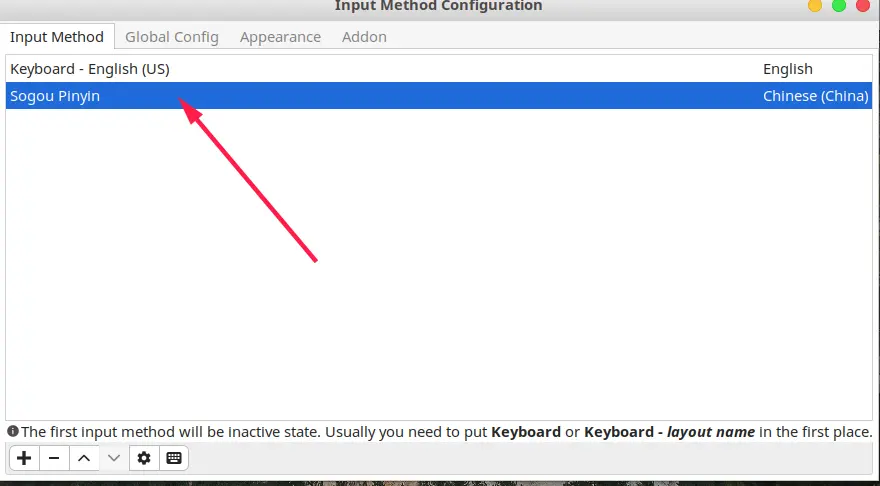
以安装搜狗输入法为例
sudo pacman -S fcitx-sogoupinyin
sudo pacman -S fcitx-im
sudo pacman -S fcitx-configtool
设置中文输入法环境变量,否则中文输入法无法启动
sudo nano ~/.xprofile
export GTK_IM_MODULE=fcitx
export QT_IM_MODULE=fcitx
export XMODIFIERS="@im=fcitx"
保存成功后,在终端输入
fcitx
启动服务 , 然后添加搜狗输入法
sudo pacman -S google-chrome
sudo pacman -S eclipse-jee
sudo pacman -S deepin-screenshot
sudo pacman -S netease-musicbox-git
sudo pacman -S xflux-gui-git
其实操作速度的提升关键的就是让手尽量少的离开键盘,所以设置的关键在于快捷键。快捷键的设置一定要把相同的操作属性使用相同的前缀,不然快捷键就会十分混乱。
Home folder ===> Win+H
Launch web brower ===> Win+G

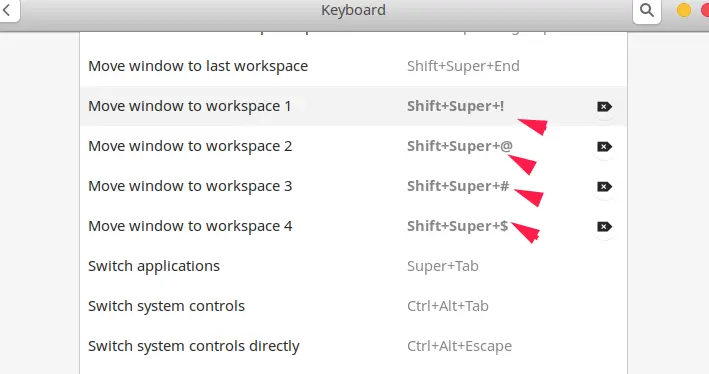
Move windows to workspace 1 ===> Shift+Win+!
Move windows to workspace 2 ===> Shift+Win+@
Move windows to workspace 3 ===> Shift+Win+#
Move windows to workspace 4 ===> Shift+Win+$
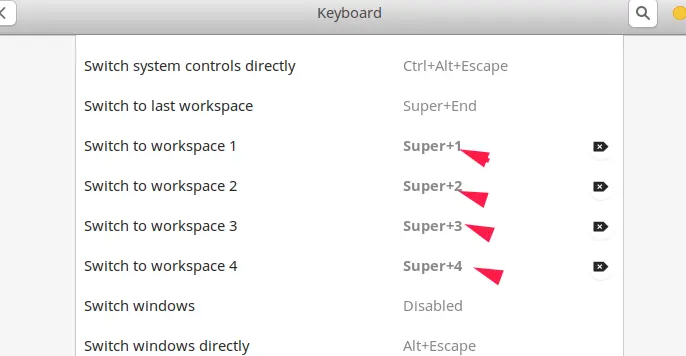
Switch to workspace 1 ===> Win+1
Switch to workspace 2 ===> Win+2
Switch to workspace 3 ===> Win+3
Switch to workspace 4 ===> Win+4
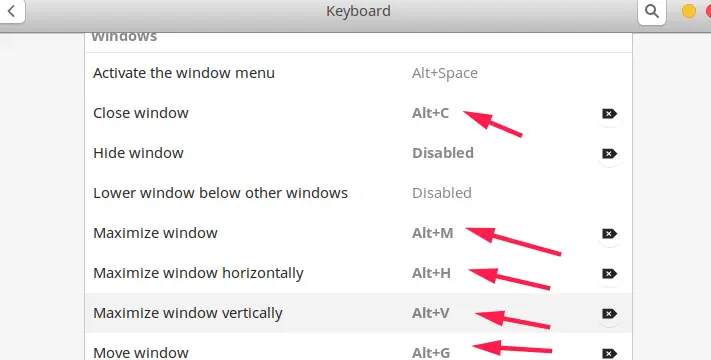
Close window ===> Alt+c
Maximize window ===> Alt+M
Maximize window horizontally ===> Alt+H
Maximize window vertically ===> Alt+V
Move window ===> Alt+G
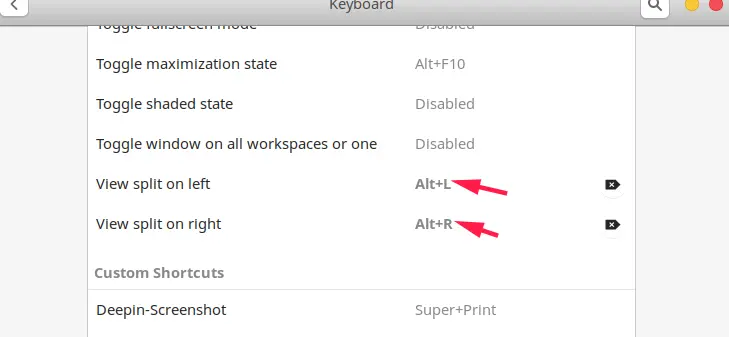
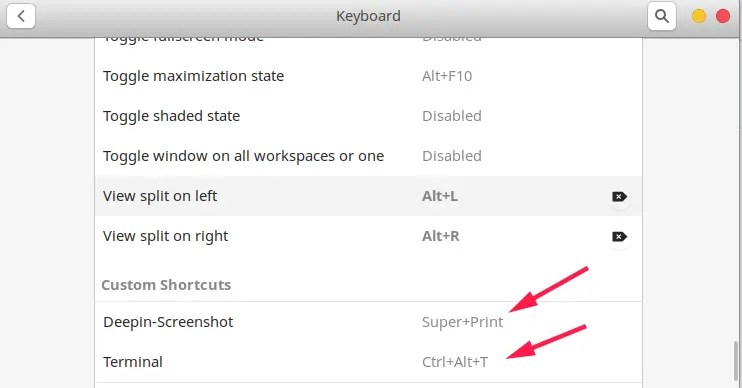
View split on left ===> Alt+L
View split on right ===> Alt+R
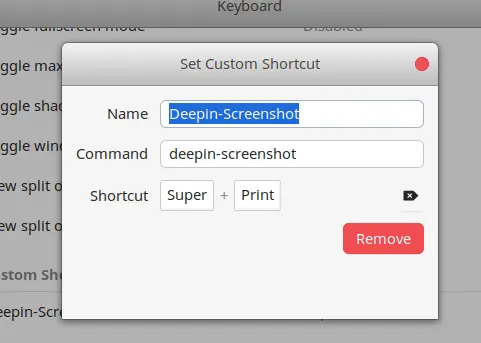
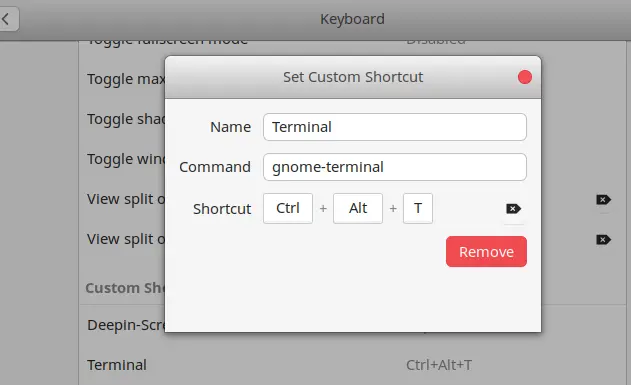
两个自定义快捷键
Deepin-screenshot ===> Win+Print
Terminal ===> Ctrl+Alt+T
其实这些快捷键已经足够使用,你也还可以根据自己的习惯去自定义一些其他的快捷键。我觉得相关的快捷键最好设置相同的前缀,这样便于记忆。所以我的快捷键都是很有规律的,容易记忆。在加上触摸板的辅助,我现在已经完全可以不带鼠标了,体验完全不输 MacOS。
对于我而言,很大一部分时间都是使用终端,所以终端的配置对我而言必不可少。
- tmux
- zsh + oh my zsh
- neovim
将 tmux 的配置文件
.tmux.conf文件放到用户主目录即可,下面是.tmux.conf文件的内容:
# set the delay of nvim in tmux
set -sg escape-time 0
unbind C-b
set -g prefix C-a

# bind a reload key
bind R source-file ~/.tmux.conf \; display-message "Config reloaded.."

# Use vim keybindings in copy mode
setw -g mode-keys vi

# invoke reattach-to-user-namespace every time a new window/pane opens
set-option -g default-command "reattach-to-user-namespace -l $SHELL"

# start selecting text typing 'v' key (once you are in copy mode)
bind-key -Tcopy-mode-vi 'v' send -X begin-selection

# copy selected text to the system's clipboard
bind-key -Tcopy-mode-vi 'y' send -X copy-pipe "rettach-to-user-namespace pbcopy"

# colors
set -g status-bg black
set -g status-fg white

# alignment
set-option -g status-justify centre

# spot at left
set-option -g status-left '#[bg=black,fg=green][#[fg=cyan]#S#[fg=green]]'
set-option -g status-left-length 20

# window list
setw -g automatic-rename on
set-window-option -g window-status-format '#[dim]#I:#[default]#W#[fg=grey,dim]'
set-window-option -g window-status-current-format '#[fg=cyan,bold]#I#[fg=blue]:#[fg=cyan]#W#[fg=dim]'

# spot at right
set -g status-right '#[fg=green][#[fg=cyan]%Y-%m-%d#[fg=green]]'

# List of plugins
set -g @plugin 'tmux-plugins/tpm'
set -g @plugin 'tmux-plugins/tmux-sensible'
set -g @plugin 'tmux-plugins/tmux-yank'

# Other examples:
# set -g @plugin 'github_username/plugin_name'
# set -g @plugin 'git@github.com/user/plugin'
# set -g @plugin 'git@bitbucket.com/user/plugin'

# Initialize TMUX plugin manager (keep this line at the very bottom of tmux.conf)
run '~/.tmux/plugins/tpm/tpm'
五、科学上网
我主要想要说一下关于科学上网的问题,现在我采用 shadowsocksr 进行科学上网。然后在浏览器上安装 Foxyproxy 插件。这个插件在 Firefox 和 Chrome 上都有。
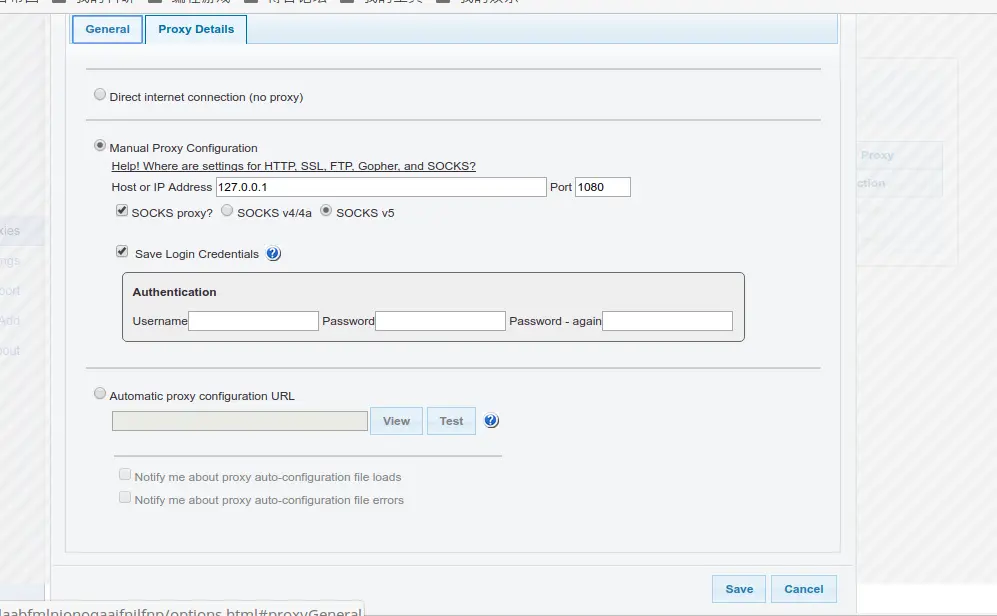
你也可以在 Gnome 上设置全局上网。
1. 全局上网
- 将 shadowsocksr 放到
/opt/目录下 - 将 shaowsocksr 的配置文件放置到
/etc/目录下 - 让 shadowsocksr 以后台启动的方式运行
cd /opt/shadowsockr/shadowsocks
sudo python local.py -c /etc/mrji.json -d start
- shadowsocksr 的关闭命令
cd /opt/shadowsockr/shadowsocks
sudo python local.py -d stop
- 设置系统代理

mrji.json 是我的 shadowsockr 的配置文件,下面是配置的模板
{
    "server":"0.0.0.0",
    "server_ipv6": "::",
    "server_port":8080,
    "local_address": "127.0.0.1",
    "local_port":1080,
    "password":"your password",
    "timeout":300,
    "udp_timeout": 60,
    "method":"aes-256-cfb",
    "protocol": "origin",
    "protocol_param": "",
    "obfs":"http_simple",
    "obfs_param": "",
    "fast_open": false,
    "workers": 1
}
2. 浏览器代理上网
这里以 Chrome 为例,Firefox 同理。
- 第一步同样是运行 shadowsocksr,
- 然后设置 Foxyproxy 的代理,如下图所示:
关于科学上网更加详细的操作参考我的另一篇文章配置你的专属 Deepin。